Skip to content
DMNO

.blog/

Safer application secrets with 1Password and DMNO

Introduction

If you’ve ever felt that sinking feeling when dealing with sensitive environment variables then this post is for you. We’ll show you how we can take them from a ‘set it and forget it until it comes back to haunt you’ concept to something that will provide confidence and safety throughout your entire development workflow.

But first, a short history lesson.

A very brief history of environment variables

Believe it or not, the humble environment variable (env var) dates back all the way to Unix Version 7 in 1979! They’ve been around longer than DOS and Windows, which quickly adopted their own notion of env vars after they came onto the scene in the 80s. Env vars exist to provide arbitrary values to running processes, and their children. They are the de facto method for storing application configuration such as secrets, feature flags, credentials, etc.

They have been largely unchanged since they appeared 46 (!) years ago. One more recent advancement was the introduction of the .env file by Heroku in 2012, used to populate their Config Vars, which were then injected into the environment during deployment. These .env files were also a means of conforming to the 12 Factor standard that Heroku’s engineering team championed. The .env file did a lot to help but it also created some unforeseen challenges.

Why your .env is failing you

Because .env became the standard, it has also devolved into a pseudo-onboarding tool. Despite knowing it’s dangerous from a security perspective, it is extremely common to share a .env file full of secrets with the new hire on Slack. Even when sharing values securely, it is often a manual one-time process, and that .env.example file which serves as a template and documentation for required config can quickly get out of sync with the real .env that it’s trying to mirror.

.env has also become an incomplete picture of what configuration is. Because of the headaches involved with collaboration, .env typically contains only sensitive or secret items, and it means the non-sensitive items tend to live elsewhere in the code. Doesn’t it seem odd that you get two keys from Stripe, but the public and private keys are defined in two different locations?

Finally, because of the nature of env vars, everything is stored as a string. This means that it’s often left to the developer to coerce values into their actual types (number, object, arrays, etc), to validate that values are populated and valid, and ideally to have type-safety for those values.

It’s not to say that there aren’t a whole host of tools out there to deal with this, but what that typically looks like is cobbling together several of them in hopes that they solve all of the above. In a larger project, this often means using an entirely different setup for each part of your stack, with no easy way to share config across different parts of your system.

Not to mention, that even in a good-enough .env setup, chances are it’s still sitting on your machine in plaintext!

There has to be a better way, right?!

A more modern approach

After speaking with a cross-section of development teams across many stages and sizes, we realized that most of them were storing sensitive information like API keys and other credentials in 1Password and then copy and pasting those into .env files, or into the GUIs on their platform of choice for deployments. And although 1Password has a few developer-centric methods for managing the items stored in your vaults (e.g., SDKs, CLI), actually using that in your code is an exercise left to the reader.

So given the flexible nature of DMNO, it was an obvious choice for one of our first plugins to allow the retrieval of items from 1Password. In addition the wealth of features DMNO already provides, with our 1Password plugin you can also:

  • Secure your entire existing .env files in a single 1Password item - i.e., secure the entire file with a single copy and paste
  • Segment config into multiple vaults per environment, service, or however makes sense for your application
  • Use the 1Password app’s biometric unlock to secure your secrets when developing locally
  • Or: use with no dependencies other than the plugin via a service account token - using the 1Password SDK under the hood

If your team is using 1Password today and duplicating secrets or writing a bunch of custom code just to sync them, then DMNO will make your life much easier and more secure.

To get started see our 1Password plugin guide.

Or read on for a full tutorial.

First let’s assume you have .env file that looks something like this:

Terminal window
API_SERVER_URL=”api.myserver.com”
API_SERVER_PORT=”4392”
DB_USER=”prod-user”
DB_PASS=”prod-secret”
DB_PORT=”5432”
DB_URI=”mydbserver.com”
DB_CONNECTION_STRING=”pgsql://$DB_USER:$DB_PASS@$DB_URI:$DB_PORT
GITHUB_TOKEN=”ijfdpaojifdipajifjdp2144oajfpijapijfdoiaj123opiijfdiopiajf”
STRIPE_TOKEN=”pk_ipjfdioajp55fidjiaopjiofd_ijjpofd14oiajfpodj”

Chances are this most resembles your production environment and you’ve got a completely different version locally, although some of the individual items might be the same. We’ll address this later, but just note that this .env drift is sort of inevitable with setups like this.

Setup

A note on requirements:

  • You’ll need Node (>20)
  • A js package manager (npm, pnpm, etc)
  • Linux/OSX/WSL

1Password

DMNO’s integration with 1Password makes use of Service Accounts. So you’ll need to create one that has access to the Vault that will hold your sensitive config items.

Note that you cannot change the access of a particular service account after it has been created.

For the purposes of this tutorial, let’s create a new Vault called DMNO Production Secrets, and create a service account that has access to only this vault. See the 1Password docs for information on creating Vaults and Service Accounts.

The local option

Since the easiest way to interact with 1Password on your local machine is their desktop application, let’s get that set up. This has the added advantage of allowing you to use biometric authentication with our plugin. **You only need to do this if you want to use the local application with the integration while working your local machine. If you just want to use service accounts, you can skip this step. **

If you haven’t already, do the following:

  • Install 1Password’s desktop application
  • Install the 1Password CLI (used to communicate with the application locally)
  • Turn on the CLI integration in the Developer Settings (see screenshot below)
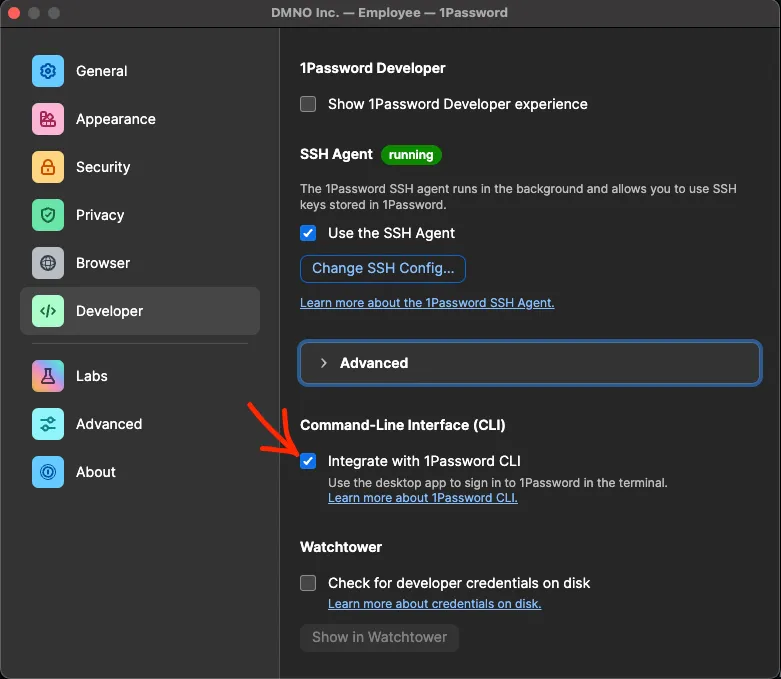
the 1Password desktop app Developer Settings tab

Check the ‘Integrate with 1Password CLI` box

DMNO

In the root of your project, or the package/service in question, run the following:

Terminal window
npx dmno init
# follow the prompts and after that is all complete
npm add @dmno/1password-plugin

After all of that you should have one, or more. .dmno/ folders. We’ll assume a single folder for now for brevity’s sake.

In your .dmno/config.mts, let’s add the code for the 1Password plugin:

import { OnePasswordDmnoPlugin, OnePasswordTypes } from '@dmno/1password-plugin';
// token will be injected using types by default
const onePassSecrets = new OnePasswordDmnoPlugin('1pass', {
fallbackToCliBasedAuth: true,
});
export default defineDmnoService({
name: ‘my-service’,
schema: {
OP_TOKEN: {
extends: OnePasswordTypes.serviceAccountToken,
// NOTE - the type itself is already marked as sensitive 🔐
},
},
});

In this code we’re importing the required parts from our plugin, creating an instance of the plugin and adding a schema item, in this case a sensitive one, that holds our service account token. You’ll notice we’re not explicitly passing the token to the plugin when we instantiate it. This is because with DMNO’s smart type system we know that we have a serviceAccountToken available to us so we can automatically inject it.

Additionally, because we have fallbacktoCliBasedAuth enabled, when no service account token is found, we’re relying on the CLI to interface with the 1Password desktop app – bypassing the service account entirely. This allows us to avoid passing around any auth tokens and use the additional biometric security provided by 1Password on your local machine. In a deployed environment, like in CI/CD, it will still use the service account you set up.

What about blob?

Let’s return to our blob-style .env file and secure it with 1Password. With everything that we’ve set up this should mean just a single copy paste and a few updates to our DMNO schema.

In the DMNO Production Secrets vault that you created, create a new Secure Note, and give it an appropriate name, such as “Prod secrets”.

In that item create a new multi-line text field, and change the label of that field to match your service name - which will be the “name” field of your package.json file or the name you used in your config.mts. In the example above, this is my-service. If you’ll only ever have a single service you can use the special _default name.

Now paste in the contents of your .env file from above.
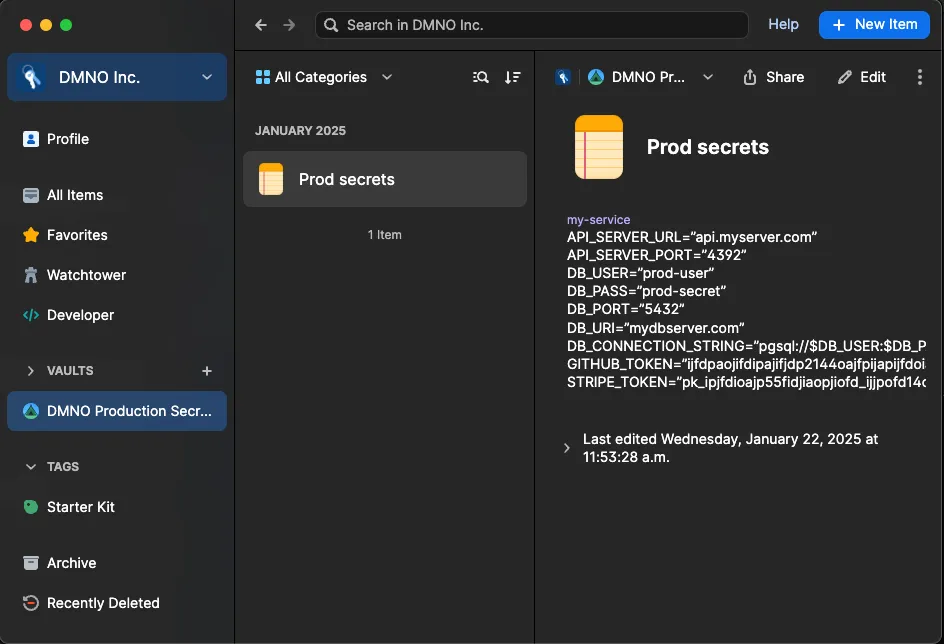
the 1Password desktop app Secure Note with the .env contents

Your vault should look something like this

Wire it up

Now all that’s left is to update our schema items to fetch from 1Password.

import { OnePasswordDmnoPlugin, OnePasswordTypes } from '@dmno/1password-plugin';
// token will be injected using types by default
const onePassSecrets = new OnePasswordDmnoPlugin('1pass', {
fallbackToCliBasedAuth: true,
envItemLink: ‘https://start.1password.com/open/i?a=I3GUA2KU6BD3IJFPDAJI47QNBIVEV4&v=wpvutzohxcj6kwstbzpt3iciqi&i=ti3v3j3fjdaipofj4ejlr373vdivxi&h=mydomain.1password.com’
});
export default defineDmnoService({
name: ‘my-service’,
schema: {
OP_TOKEN: {
extends: OnePasswordTypes.serviceAccountToken,
// NOTE - the type itself is already marked as sensitive 🔐
},
// include as many items as you want to fetch from your 1Pass .env item
// we’ll include two for brevity’s sake
GITHUB_TOKEN: {
required: true,
sensitive: true,
value: onePassSecrets.item(),
},
STRIPE_TOKEN: {
required: true,
sensitive: true,
value: onePassSecrets.item(),
},
},
});

First, we add the envItemLink to the plugin initialization which tells it to look in a particular item for the env blobs. Then, for each schema item (wired up via the .item() method) it will look in the my-service entry for a key that matches and securely load the value. Finally, we’ve added the required and sensitive so that DMNO can use appropriate validation and security rules for the items.

Improved DX

Now in your application code you can use the DMNO_CONFIG globals to reference config items and benefit from improved type-safety and Intellisense.

const GH_TOKEN = process.env.GITHUB_TOKEN;
const GH_TOKEN = DMNO_CONFIG.GITHUB_TOKEN;

DMNO IntelliSense

And, naturally, you will also benefit from all the additional features that DMNO provides including: validation, coercion, leak prevention and detection, and log redaction – to name a few.

DMNO Validation

What next?

To recap, you now have env vars stored securely in 1Password. You’re using biometric authentication when developing locally and service accounts everywhere else. Your items are now type-safe, validated, and kept in sync automatically.

Things are feeling good. 😎

Next, you may want to:

  • break out your blobs into individual items in 1Password (read more).
  • have multiple vaults with differing levels of access (e.g., one for dev and one for prod). (read more)
  • Add further validation and documentation to the individual items (read more)

Level up your env var tooling in Next.js with DMNO

We’re super excited to finally announce that our Next.js integration is ready - and we believe it is the BEST way to manage configuration in Next.js apps. Dealing with config is Next.js has usually been an afterthought - use process.env, maybe a .env file, and call it a day. But the whole experience is clunky and leaves you open to some major security risks.

Here’s a quick overview of the main problems and how DMNO solves them:

👷 Beyond type-safety

Problem: Environment variables are always plain strings, so you must coerce and validate them yourself (if at all). You also won’t get any types on process.env unless you manually add them, and you probably shouldn’t put a coerced non-string values back into process.env anyway.

Solution: DMNO lets you define a simple schema for your config. Aside from being more clear, this lets us do some magical things:

  • Easily add coercion and validation to your config, so you are guaranteed the data is what you think it is
  • Validates your config during your build and before boot, so you’ll know exactly what’s wrong before bringing down prod
  • Auto-generated TypeScript types that match your schema, including detailed JSDoc comments explaining what each config item does

Validation demo

Intellisense demo

🔐 Effortless secure collaboration

Problem: Every time we onboard a new team member or add a new external service, we often need to share some set of secrets. You’ve never sent anything like that over slack… right?? Not to mention needing to keep all the various platforms we build, test, and run our applications on all in sync.

Solution: With your schema as part of your repo, you’ll never pull down the latest only to be met with unexpected crashes due to missing config. Inline documentation and validations let you know exactly what each config item does, and whether it is required. Plugins let you sync sensitive config securely, either encrypted in your repo, or with secure backends like 1Password. Plus unifying how config is managed makes it much easier to reason about and debug.

1Password demo

🤐 Leak detection

Problem: With the edges of client and server getting blurrier each day, it has become easier to accidentally leak sensitive config. Your secrets can end up in server-rendered pages and data, built javascript code, or be sent to the wrong 3rd party - especially logging and error tracking tools.

Solution: DMNO does everything possible to protect you from accidental leaks. These features are opt-in but we think they are invaluable.

  • DMNO patches global console methods to scrub sensitive data from logs
  • Built client JS files and outgoing server responses are scanned for leaks before they are sent over the wire
  • outgoing HTTP requests are scanned to make sure secrets can only be sent to whitelisted domains - e.g., only send your Stripe key to api.stripe.com

Log redaction demo

Astro leak middleware demo

HTTP interception demo

📐 Dynamic configuration control

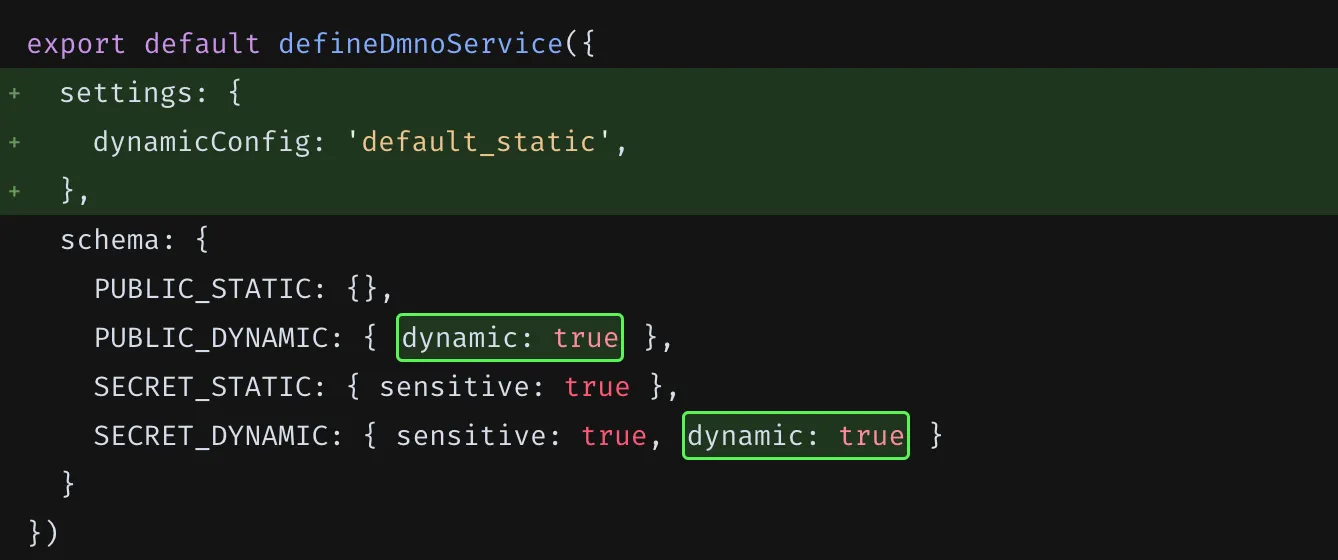
Problem: The NEXT_PUBLIC_ prefix controls whether config is public AND whether it will be static, meaning replaced at build time. If you want build once and deploy for multiple contexts, you’ll have to awkwardly wire up fetching the config on your own.

Solution: DMNO decouples the concepts of “sensitive” and “dynamic”, and supports both sensitive+static and public+dynamic config, and lets you set them explicitly in your config schema. This finer control is easier to reason about and we handle the hard part for you. See our dynamic config guide for more details.

Dynamic schema example

🌲 Unified config system

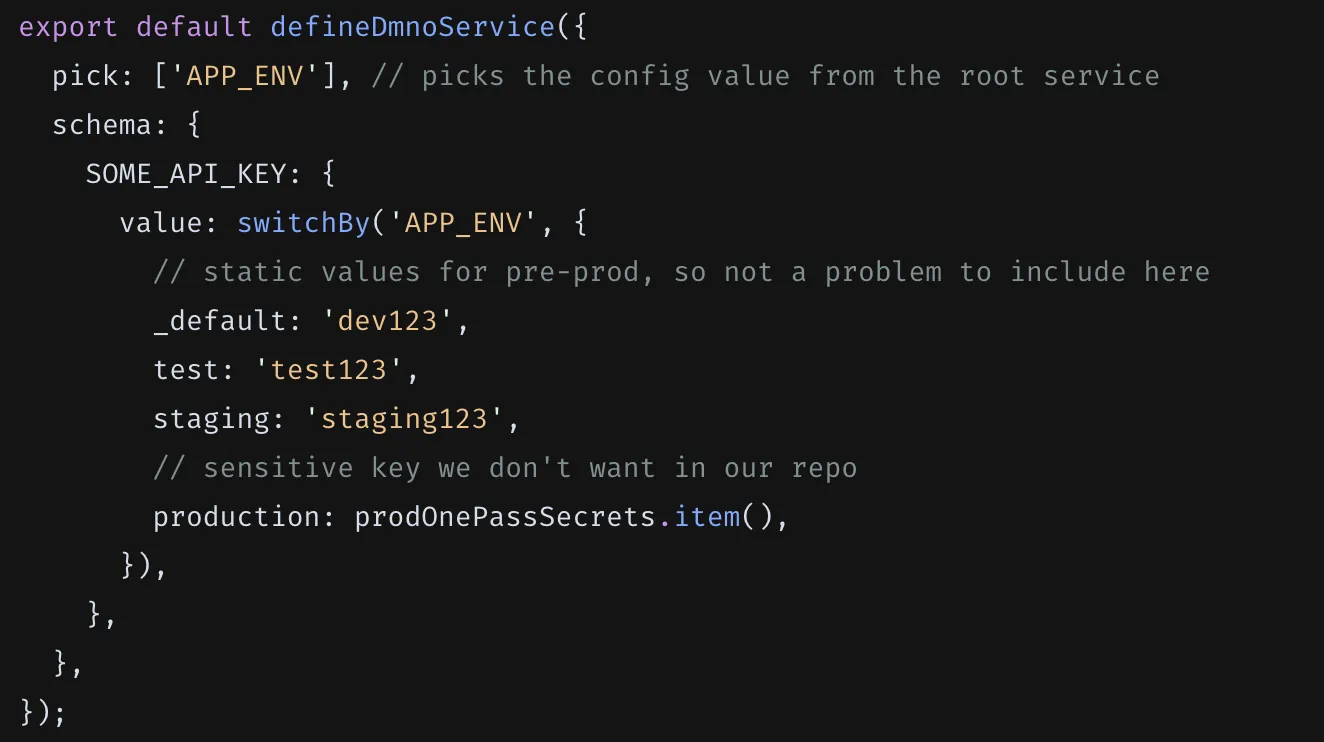
Problem: In a larger projects, especially monorepos, each part of your system ends up with its own hacked together config tooling, and there’s no way to share config across services. Keeping things in sync is error-prone and awkward, and dealing with many different tools is a pain.

Solution: DMNO lets you easily define config once and share it across your entire monorepo. Even outside of monoepos, using the same config system across your entire project will make your life much easier.

Pick schema example

⛓️ Flexible value dependencies

Problem: Ideally we could set config values based on other values. While Next.js does have some built-in handling of multiple environment specific .env files (e.g., .env.production), this behavior is tied to the value of NODE_ENV. Since npm module installation behavior is also affected by this, often you’ll end up running your build with NODE_ENV as development even when doing a non-production build. You can also use $ expansion to do some basic referencing, but it’s extremely limited.

Solution: DMNO’s config resolution logic allows you to reference other values however you like. You can define switching logic based on any value (not just NODE_ENV) and reuse values within arbitrary functions. Your configuration schema all forms a reactive DAG, which can also be visualized for simple debugging.

Config reuse schema example


So what’s Next

While much of what was described above is not specific to Next.js, a TON of specific work went into making sure our Next.js integration just works without additional setup on your part. We want this to become the default way that everyone deals with configuration in their Next apps, and for JS/TS in general. This stuff may seem like it’s not a problem, and day to day it may not be - until it bites you. Setting up your schema isn’t much harder than writing a .env.example file and you get SO much more, so please give it a try, and let us know what you think!

Type-safe and secure Astro configuration with DMNO

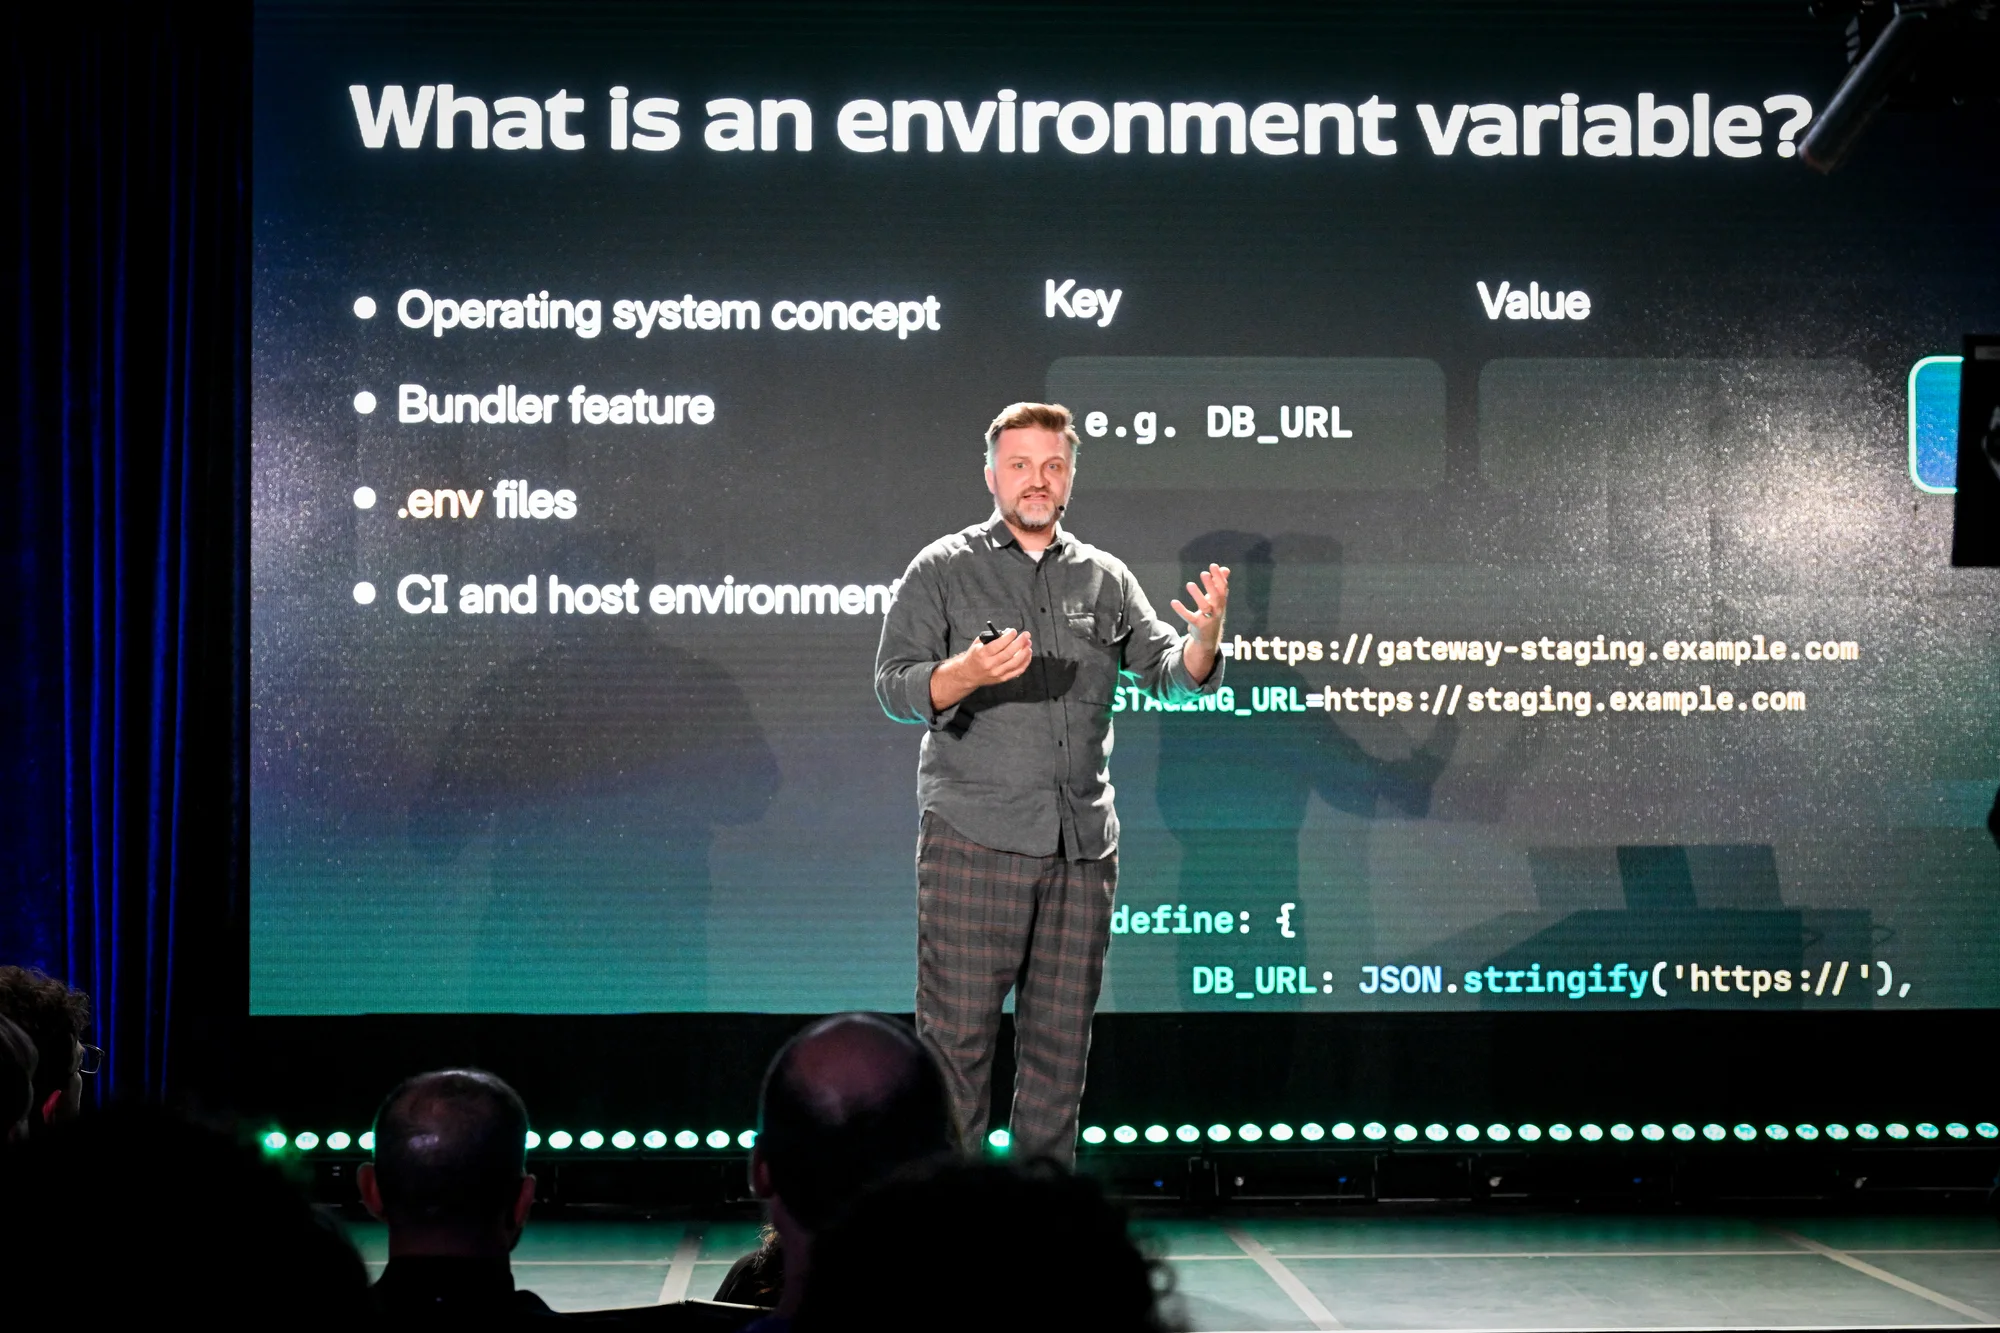
ENV VARS Astro CTO Matthew Phillips presenting Astro’s new astro:env feature at Astro Together in Montreal.

Configuration in Astro has improved drastically in recent weeks. We launched DMNO, including our Astro integration, and shortly after Astro launched their official (experimental) astro:env feature in version 4.10. We were very excited to see this on the main stage at Astro Together in Montreal (see above ^^), and to talk with the core team about how we can work together to make configuration in Astro even better. There’s already some great cross-pollination happening, and we’re excited to see where it goes.

We’re really glad to see Astro taking configuration seriously, and we’re excited to see how the community uses these new tools to build even better sites. That said, we do think DMNO has some unique advantages that make it a great choice for many Astro projects, especially if you want to share config among other services, or collaborate securely with your teammates.

Here’s a quick overview of what DMNO can do for you:

Key Features

  • True type-safety Your config values are coerced, validated, and accessible with complete type-safety. Fail fast and early rather than bringing down production. Validation demo

  • Built-in docs for your config We generate very rich types from your config schema, giving you built-in docs (Intellisense) for all of your config. Intellisense demo

  • Store secrets securely: Use plugins to store and sync your sensitive config items in an encrypted file within your repo or remotely in 1Password. More secure backends coming soon! No more insecurely sharing secrets over slack! 1Password demo

  • Leak detection: DMNO ensures that only non-sensitive config is accessible on the client side, and ensures sensitive config is never leaked by injecting an Astro middleware that scans rendered server responses before sending them over the wire. Astro leak middleware demo

  • Log redaction: DMNO redacts sensitive data from all global console method output, ensuring that your secrets are never exposed or persisted in your logs. Log redaction demo

  • HTTP interception: DMNO intercepts HTTP requests to prevent sensitive data from being sent to the wrong third-party services. e.g., Only send your Stripe key to api.stripe.com. HTTP interception demo

  • Share config items in your monorepo: Unified config system for all of your services, with the ability to easy reuse items from the root or other services. Even outside of monorepos, using the same config system for your entire stack simplifies things.

  • Static and dynamic config: Fine control over which items are static (injected at build time) vs dynamic (loaded at boot), with additional safe-guards around using dynamic config during static pre-rendering. We even support dynamic public config loaded at runtime.

Plus it’s super easy to get started:

  • Automatic initialization: Using dmno init, DMNO detects your Astro setup, automatically installs necessary packages, and updates your Astro config file.

  • Easy scaffolding: DMNO scaffolds your config schema based on existing .env files and references to env vars throughout your codebase.

  • Accessible config objects: Just swap your calls from process.env/import.meta.env to the DMNO_CONFIG global that is automatically injected into your application. This gives you access to your type-safe config, helpful errors, and access to public+dynamic config items (if applicable).

Astro-specific features:

Most of these features are standard to DMNO, but there are a few Astro specific benefits and features:

  • Use env vars in astro config: Easily access env vars directly in your astro.config.* files.

  • Middleware injection: Automatically injects a middleware which detects leaked secrets in rendered responses as well as built js files being sent to the client. This middleware also warns if you accidentally use dynamic config items during pre-rendering of static pages.

  • Adapter support: Full support for the Netlify and Vercel adapters, with more in the works.

Get started

DMNO provides the most powerful way to manage configuration in Astro projects, all while enhancing security, and improving developer experience.

All it takes is npx dmno init 🎉

For more detailed information, visit the DMNO Astro Integration Guide.

Announcing DMNO's Developer Preview

Hello DMNO 👋

We (Theo and Phil), are happy to announce the Developer Preview of our new project, DMNO. Our first release is a configuration engine that helps you manage your configuration in a single place, and access it in a type-safe way across your services.

We’ve been heads down working on this project for a while now, and we’re excited to share it with you and let the community shape its future. While it’s still early days, we’re can’t wait to see what you build with it.

To make things easier to get started we’ve created a few integrations with popular frameworks and tools, and we’re working on more.

We’ve also created a few plugins to help you securely manage your secrets and other sensitive configuration items.

To get started you can check out our quickstart guide, or dive into our schema guide.

We’ve also create a short video that goes over the basics of DMNO, and how it can help you manage your configuration. Check it out below:

What’s next?

We will continue to build out more integrations, and evolve our configuration engine in response to your feedback.

In addition to that, we have two big products on the horizon:

  • DMNO Dev: A UI-driven way to run your full stack apps locally, powered by DMNO’s configuration engine.
  • DMNO Deploy: A way to deploy your apps to your existing platforms, powered by DMNO’s configuration engine.

Our goal is to make it as seamless as possible for you to configure, run, and deploy your entire stack and we’re just getting started!